How To Level Flooring Before Installation
One of the trickiest parts of installing flooring yourself is getting the floor level before installation. The subfloor, the layer (usually made of plywood) that provides you a surface over the joists, might look flat to the untrained eye. But across the width of the room, the levels can grade just a fraction of an inch, and while it might not seem too bad, it can seriously affect your finished flooring.
Without a level subfloor, your hardwood or tile flooring can buckle and crack, damaging these expensive materials. Prevent this by taking the job of levelling your floors seriously!
Levelling Small Dips In Subflooring
 The first step is to see what you’re dealing with if anything at all. If there are small gradients of more than 1/8 – 3/16 of an inch, level out the existing flooring. To figure this out, get a carpenter’s level or a laser level and lay it across the subfloor. Examine the bubble or look for space under the level, working your way in every direction. Use a pencil to mark the highs and lows.
If you’ve figured out the highs aren’t a consistent problem, prep the room and yourself for sanding: seal it off from other rooms, cover vents, get a package of dust masks, and open the windows for ventilation. You can do this job by hand, but for larger areas, an edge floor sander can make it much easier. Use medium-grit sandpaper to get rid of those high spots in the subfloor.
If you want to level out the dips instead, purchase some levelling compound from your local hardware store (but keep that sander!). After mixing it, spread the compound on the low spots with a trowel or putty knife, taking care to blend the edges into the surrounding subfloor. Let the compound dry for as long as directed, then sand it down with medium grit sandpaper so that it is even with the subfloor.
Installing New Subflooring
Not everything can be sanded away, though. In older houses especially, the level of the room might be so off that a new subfloor has to be installed. It’s a lot easier than it sounds, though it is some work; give yourself a weekend to get it all done!
To start, mark out the joists with a marker and use a level to measure the drop, writing the measurements on the subfloor. The smallest number will be your high point, and you can subtract this height from each measurement to get a sense of the gradient.
For a comprehensive redo of the subfloor, you’ll need thin strips of wood known as “furring strips”. Furring strips need to be cut with your table saw at an angle that will correct the drop. to determine the thickness of the furring strips, subtract the height from each measurement in the drop, and cut the furring strip at that angle.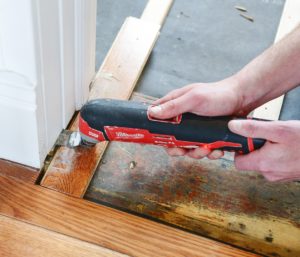
Once you have the strips you need, lay the furring strips down on the floor with a construction adhesive, screw them into the joists, and remeasure the level. If you need to give it some fine tuning, sand the high spot or use a small piece of wood known as a shim beneath the furring strip to raise it. When you’re content with the level, lay down your new subflooring wood, putting an adhesive between the plywood and the furring strip to prevent squeaking.
Levelling is crucial for stable flooring, and if the entire floor is off, it might be a sign of something worse. Figuring out why your floor drops are key to prevent it from getting worse, and you may need to shore up the joists or basement posts before fixing the subfloor itself. If there’s rot in the framing, or the foundation is off-kilter, it won’t matter how well you level the room – you’ll only be covering a costly problem! Contact us if you have any questions.


